灌溉梦想,记录脚步

ubuntu 配置 vnc server

  通过将服务器配置成VNC SERVER,可以让其他主机使用图形方式登录这台服务器。
  在ubuntu下配置vnc server很简单,方法如下:
  服务器端:
  1、先安装VNC服务程序:
  $ sudo apt-get install vnc4-common vnc4server
  2、给当前用户设置vnc登录密码:
  $ vncpasswd
  3、修改vnc的默认设置,使启动时运行gnome作为X的桌面(如果不设置,vnc将使用twm,你可以试试,相信你会很不习惯的):
  $ vncserver :1
  $ vncserver -kill :1
  注意:里面的":1"代表display号,客户登录的时候得写相同的display号才能登录(见后面客户端部分)。
  修改~/.vnc/xstartup文件:(红字是修改和增加的东西)
  #!/bin/sh
  # Uncomment the following two lines for normal desktop:
  # unset SESSION_MANAGER
  # exec /etc/X11/xinit/xinitrc
  [ -x /etc/vnc/xstartup ] && exec /etc/vnc/xstartup
  [ -r $HOME/.Xresources ] && xrdb $HOME/.Xresources
  xsetroot -solid grey
  vncconfig -iconic &
  xterm -geometry 80×24+10+10 -ls -title "$VNCDESKTOP Desktop" &
  # twm &
  gnome-session &
  上面修改的意思是将默认启动的twm程序改为gnome,如果想用KDE作为桌面的,可以改为:startkde &
  然后再次启动VNC SERVER:
  $ vncserver :1
  客户端:
  1、安装VNC客户程序:
  $ sudo apt-get install vnc4-common xvnc4viewer
  2、然后你就通过Terminal Server Client登录了:Applications -> Internet -> Terminal Server Client;Computer为:服务器IP:display#,例如:12.34.56.78:1;protocol选择:VNC。
国产Linux发行版 CDLinux

CDlinux 是一种小型的迷你 GNU/Linux 发行版,其名称取自英文的 “Compact Distro Linux“。CDlinux 的体形小巧,功能却挺强大。

CDlinux 包含了最新的 Linux 内核,Xorg 图形界面,XFce 窗口管理器,和许多其它流行软件,如 Firefox 浏览器,Pidgin 即时通讯程序等等。并且 CDlinux 发行版中还包含了各种重要的、常用的库文件,用户可以很方便地按自己的需要扩展 CDlinux。

CDlinux 能很好地支持国际化(i18n)和各种语言、locale,目前对简体中文(zh_CN)、传统中文(zh_TW)和英文(en_US)提供全面支持。用户也可以很方便地定制 CDlinux 以支持他们自己的语言、locale。

CDlinux 能自动检测出自己被安装在什么设备上。你可以把 CDlinux 安装到 CD、DoC、Flash、HD 或者 MD 等类型的驱动器上,这些驱动器可以连接在 ATA、SATA、SCSI、USB 或者 IEEE1394 等总线上。在绝大多数情况下,CDlinux 都能自动识别这些设备并找到自己。

CDlinux 支持多种文件系统,你可以把它安装到 ext2、ext3、jfs、reiserfs、xfs、isofs、udf 及 hfs、hfsplus、fat、ntfs 等等分区上,CDlinux 都能自动挂载它们、找到自己并正常启动。

CDlinux 是高度灵活、可定制的。你可以拿它作为一个功能强大的系统修复、维护工具;你也可以加上自己需要的软件把它扩展成一个功能全面的桌面操作系统;还可以去掉 自己不需要的功能,把 CDlinux 裁减成一个嵌入式系统。完全可以按需定制你自己的 CDlinux。

使XenServer的vm通过pxe启动的方法

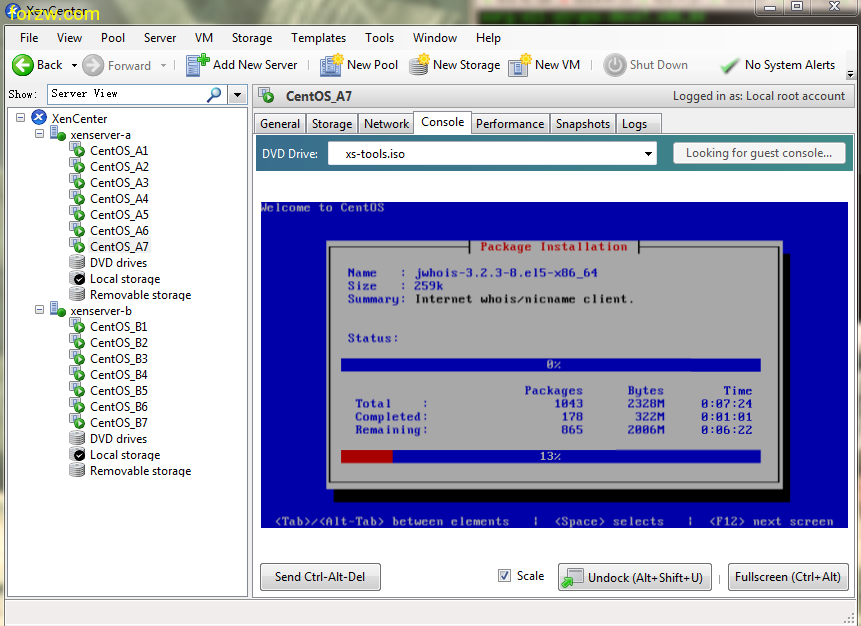
在默认情况下,按照特定系统类型(比如centos5.4)建立的虚拟机是无法通过pxe安装的。在普通模式下选择一个iso或者一个网络的iso文件才可以启动系统,这样是找到不到网络启动选项的,在还原模式启动后虽然可以使用pxe安装,但安装后并不能使用。
可以使用这个方法解决:
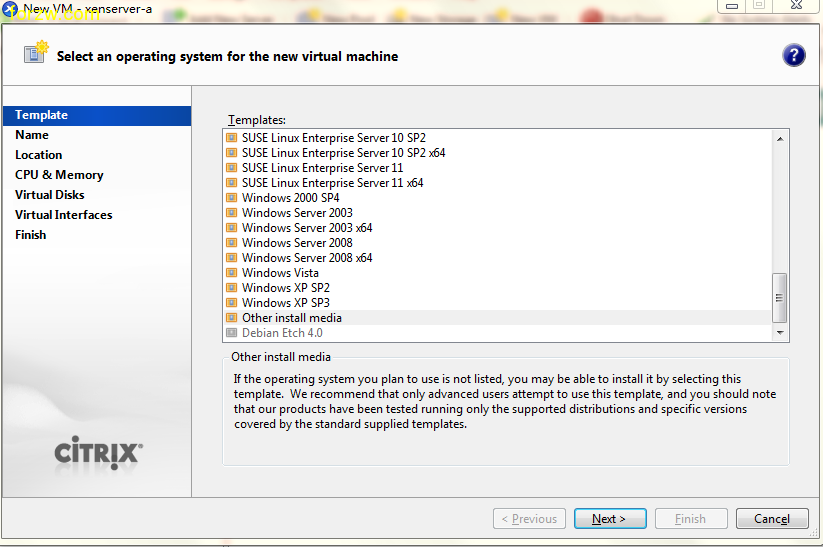
1,建立虚拟机时候选择“other install media” 如下图:

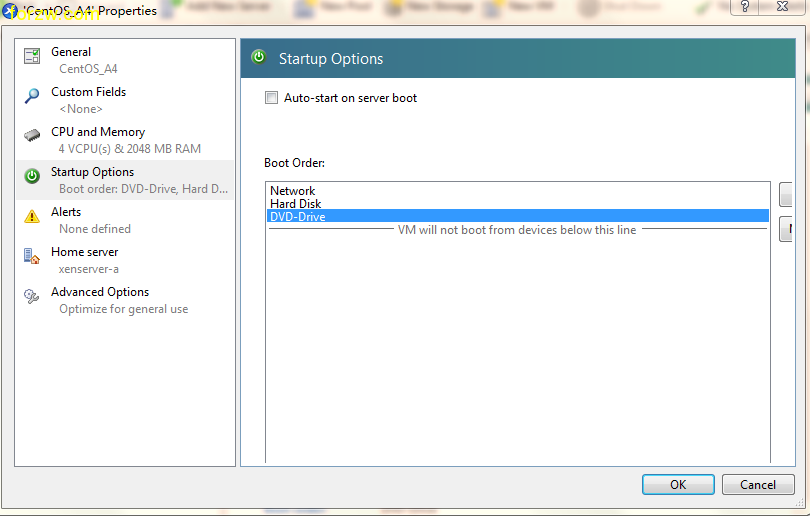
2,在启动后打开“startup options选项”,默认情况是不使用网络启动的,修改下,如下图:

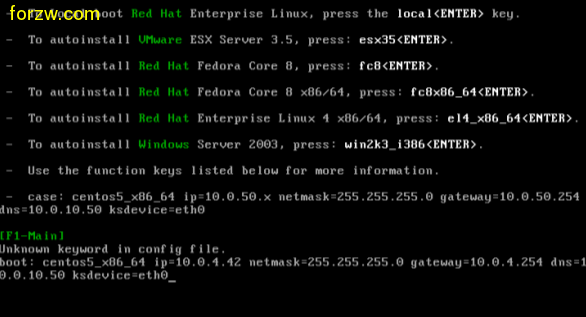
3,之后发送“ctrl + alt + del“键重启,即可看到pxe启动界面,如下图:

结婚的意义(几米)

[align=center]


[/align]

磁盘阵列技术-术语汇编

STP:IEEE Std 802.1D-1998定义,不能快速迁移。即使
是在点对点链路或边缘端口,也必须等待2倍的forward delay
的时间延迟,网络才能收敛。

RSTP:IEEE Std 802.1w定义,可以快速收敛,却存在以
下缺陷:
局域网内所有网桥共享一棵生成树,不能按vlan
阻塞冗余链路。

MSTP可以弥补这样缺陷,它允许不同vlan的流量
沿各自的路径分发,从而为冗余链路提供了更好的
负载分担机制。

MSTP:
Multiple Spanning Tree Protocol
多生成树协议
在规范IEEE Std 802.1s中第13节描述。
MSTP算法通过应用MSTP、STP或RSTP的桥任意互连的桥接网络,为分配给任一个特定VLAN的帧提供了简单而完备的连通性。
MSTP允许不同VLAN的数据从各自的路径分发。各条路径建立在由LAN和MST桥组成的MST域中的各个独立的多生成树实例的基础上。

svn库中添加、删除、提交文件的脚本

#!/bin/bash
COUNT=`svn status | grep '^?' |wc -l`
until [ $COUNT -lt "1" ]
do
CURRENT=`svn status | grep '^?' |awk {'print $2'} | head -$COUNT | tail -1`
echo "Do you want to add $CURRENT? (y/n): "
read ANS
if [ $ANS = "y" ]
then
svn add $CURRENT
echo "$CURRENT added to repository"
COUNT=`expr $COUNT – 1 `
elif [ $ANS = "n" ]
then
COUNT=`expr $COUNT – 1 `
fi
done

COUNT=`svn status | grep '^!' |wc -l`
until [ $COUNT -lt "1" ]
do
CURRENT=`svn status | grep '^!' |awk {'print $2'} | head -$COUNT | tail -1`
echo "Do you want to delete $CURRENT? (y/n): "
read ANS
if [ $ANS = "y" ]
then
svn delete $CURRENT
echo "$CURRENT added to repository"
COUNT=`expr $COUNT – 1 `
elif [ $ANS = "n" ]
then
COUNT=`expr $COUNT – 1 `
fi
done

echo "Enter a commit message: "
read MSG
svn commit -m "$MSG"

How To Create A Cluster Testbed Using CentOS 5 Vir

  A. Overview
  This guide attempts to provide a Xen based test environment where you can practice setting up a two node cluster (cluster setup itself is not discussed here – I'm merely giving you what you need to set it up).
  XEN can host two type of guest systems para-virtualized and fully-virtualized:
  for para-virtualized guests you require the Red Hat Enterprise Linux 5 installation tree available over NFS, FTP or HTTP.
  for fully-virtualized guest installations you will require DVD or CD-ROM distribution media or a bootable .iso file and a network accessible installation tree
  For details, please refer to the RHEL5 Virtualization Manual.
  I'll be using para-virtualized guests here in my setup. There will be three systems involved here:
  node00 – physical system
  virtual IPs: 192.168.222.1 (public1 vlan)
  192.168.100.1 (private1 vlan)
  node01 – para-virtualized guest 1
  virtual IPs: 192.168.222.10 (public1 vlan)
  192.168.100.10 (private1 vlan)
  node02 – para-virtualized guest 1
  virtual IPs: 192.168.222.20 (public1 vlan)
  192.168.100.20 (private1 vlan)
  B. What I used
  an HP Blade bl25p machine with 4G of RAM (this is actually an AMD64 blade machine). A machine with decent amount of RAM and processing speed should do.
  Centos i386 5 update 1 www.centos.org DVD ISO downloaded HTTP, NFS and FTP installation sources were created from this iso. Also, the yum repository that can be used by host and guest systems will be generated from the centos iso image.
  logical volumes hosting the guests and the "virtual luns" via iscsi (you can also use disk partitions – please refer to the virtualization guide for details).
  1. My LVM setup
  The following is my LVM configuration. The lvLUN0* entries are the ones I used for iSCSI setup and will be shared by the two virtual guest systems.
  lvs
  LV VG Attr LSize origin Snap% Move Log Copy%
  lvLUN01 Virtual00VG -wi-ao 50.00G
  lvLUN02 Virtual00VG -wi-ao 50.00G
  lvNODE01 Virtual00VG -wi-ao 30.00G
  lvNODE02 Virtual00VG -wi-ao 30.00G
  lvNODE03 Virtual00VG -wi-ao 15.00G
  lvsys00 vg00 -wi-ao 512.00M
  lvsys01 vg00 -wi-ao 8.00G
  lvsys02 vg00 -wi-ao 8.00G
  lvsys03 vg00 -wi-ao 512.00M
  lvsys04 vg00 -wi-ao 128.00M
  lvsys05 vg00 -wi-ao 1.00G
  lvsys06 vg00 -wi-ao 256.00M
  C. Host Preparation
  I'm assuming that you know how to install CentOS or other RHEL based distributions and that you are familiar with rpm installation. Since I do a lot of setup for test/dev environments at work, I already have an installation server making it easy to do a network based install via PXE. The kickstart file for node00 is provided below. You can do a local media install (you have the ISO so you can burn it to a DVD) and just refer to the kickstart file for some of the configuration. The list of packages I used is in the %packages section of node00's kickstart file. You can install them manually using yum, like:
  # will list centos installation groups
  yum grouplist
  # will install Virtualization group
  yum groupinstall Virtualization
  1. ks file and installation
  1.a kickstart file I use for the host (node00)
  You'll have to modify the following to suit your setup.
  ## START node00_ks.cfg
  #modify for your own settings
  install
  nfs –server=remote_server –dir=/path/to/CENTOS5U1/i386
  lang en_US.UTF-8
  keyboard us
  skipx
  reboot
  network –device eth2 –bootproto static –ip a.b.c.1 –netmask 255.255.255.0 –gateway a.b.c.2 –nameserver x.y.z.n –hostname node00.example.com
  # grub and root password is a1s2d3f4g5
  rootpw –iscrypted $1$3CXK2$CG9WlX2PuPpp7nxYMQGwP0
  firewall –disabled
  authconfig –enableshadow
  selinux –disabled
  timezone Asia/Singapore
  bootloader –location=mbr –driveorder=cciss/c0d0 –append="rhgb quiet" –md5pass=$1$3CXK2$CG9WlX2PuPpp7nxYMQGwP0
  clearpart –all –initlabel –drives=cciss/c0d0
  part /boot –fstype ext3 –size=100 –ondisk=cciss/c0d0
  part pv.100000 –size=100 –grow –ondisk=cciss/c0d0 –asprimary
  volgroup vg00 –pesize=32768 pv.100000
  logvol /tmp –fstype ext3 –name=lvsys05 –vgname=vg00 –size=1024
  logvol /opt –fstype ext3 –name=lvsys04 –vgname=vg00 –size=128
  logvol /var –fstype ext3 –name=lvsys03 –vgname=vg00 –size=512
  logvol /usr –fstype ext3 –name=lvsys02 –vgname=vg00 –size=8192
  logvol swap –fstype swap –name=lvsys01 –vgname=vg00 –size=8192
  logvol /home –fstype ext3 –name=lvsys06 –vgname=vg00 –size=256
  logvol / –fstype ext3 –name=lvsys00 –vgname=vg00 –size=512
  %packages
  @development-libs
  @editors
  @system-tools
  @text-internet
  @x-software-development
  @virtualization
  @dns-server
  @core
  @base
  @ftp-server
  @network-server
  @legacy-software-development
  @base-x
  @web-server
  @printing
  @server-cfg
  @sql-server
  @admin-tools
  @development-tools
  lsscsi
  createrepo
  audit
  net-snmp-utils
  iptraf
  tftp
  lynx
  mesa-libGLU-devel
  kexec-tools
  bridge-utils
  device-mapper-multipath
  vnc-server
  xorg-x11-server-Xnest
  xorg-x11-server-Xvfb
  imake
  openmotif
  -vim-enhanced
  -zisofs-tools
  -zsh
  -bluez-hcidump
  -sysreport
  ## END of node00_ks.cfg
  2. Host configuration
  Setting up an HTTP, NFS and FTP installation server:
  2.a web server
  #/etc/httpd/conf.d/centos5u1.conf
  Alias /centos5u1 /var/ftp/pub/centos5u1
  
  Options Indexes FollowSymLinks MultiViews
  IndexOptions FancyIndexing
  Order deny,allow
  Deny from all
  Allow from 127.0.0.1 ::1 all
  
  Then start the httpd service and make sure it does during startup:
  service httpd start
  chkconfig httpd on
  2.b NFS server
  Edit /etc/exports and put the following into it:
  # /etc/exports
  /var/ftp/pub/centos5u1 192.168*(ro)
  service nfs start
  chkconfig nfs on
  2.c FTP server
  Since we already have the source in /var/ftp/pub/centos5u1, all that is needed is to start vsftpd:
  service vsftpd start
  chkconfig vsftpd on
  2.d YUM repository
  For this setup, I only use a local yum repository from the Centos DVD ISO I downloaded. First, I loopback mount it in /var/ftp/pub/centos5u1/i386/:
  cd /var/ftp/pub/centos5u1/
  mkdir temp
  mount -o loop CentOS-5.1-i386-bin-DVD.iso temp
  cp -pr temp i386
  umount temp
  createrepo -g i386
  (i386/repodata/ will then be updated.)
  For RHEL5, it's different:
  createrepo -g repodata/comps-rhel5-server-core.xml Server
  You need to do this inside the i386 directory (after loopback mounting and copying the whole directory structure).
  2.d.1 the yum repo configuration:
  I renamed the default repo files in /etc/yum.repos.d/ to *-repo (instead of *.repo) to disable them. I then created this file:
  #/etc/yum.repos.d/CentOS5.repo
  [centos5-Server]
  name=CentOS5 Server
  baseurl=http://node00/centos5u1/i386
  enabled=1
  gpgcheck=1
  gpgkey=file:///etc/pki/rpm-gpg/RPM-GPG-KEY-CentOS-5
  node00 needs to be defined in /etc/hosts for the above file to work. or just replace node00 with its IP address.
  2.e VNC server
  You won't be needing a vnc connection if you have local console access to the physical machine. All you need to do is switch into gui mode:
  telinit 5
  and open a gui terminal (like gnome-terminal or kde konsole). But since I do everything remotely, I use vncserver and vncviewer to do gui based stuff.
  2.e.1 run vncserver:
  This will bringvup a vncserver in node00 that is accessible via "vncviewer" at node00:1 (assuming node00 is resolveable from your vncviewer host).
  vncserver
  You will require a password to access your desktops.
  Password:
  Verify:
  xauth: creating new authority file /root/.Xauthority
  New 'node00.example.com:1 (root)' desktop is node00.example.com:1
  Creating default startup script /root/.vnc/xstartup
  Starting applications specified in /root/.vnc/xstartup
  Log file is /root/.vnc/node00.example.com:1.log
  How To Create A Cluster Testbed Using CentOS 5 Virtualization And iSCSI – Page 2
  How To Create A Cluster Testbed Using CentOS 5 Virtualization And iSCSI – Page 3
  next
  How To Create A Cluster Testbed Using CentOS 5 Virtualization And iSCSI – Page 2
  Copyright ? 2008 roderick tapang